Tuesday, November 23, 2010

Cinnamon Rolls -- From Scratch!


After receiving a dutch oven for my birthday, I've developed a mild obsession with it. I'm cooking, baking, grilling, simmering, and roasting every and anything I can fit inside it. Truly one of the great cooking inventions.

Anywho... with the weather being dreary and drizzling such as it is, I felt like a batch of cinnamon rolls sounded like a solid plan. But not those store-bought "unwrap and bake" types -- from scratch and 100% homemade. I searched around the internet for something like 15 minutes before finding a suitably light dough recipe. For most dishes, it only takes me a minute or two to find a good "jumping-off point" recipe; finding one for cinnamon roll dough was quite an undertaking!

When I had settled on a good basic premise, I began modifying the dough and filling recipes. It took me two batches until the memory of cinnamon roll taste I had in my head matched the taste of my food. I made more for my co-workers and family, all of whom said it was utterly divine. Here's what I came up with...

Method

First, heat 3/4C of milk to between 120 and 140 degrees. Then mix in 1/4C of softened butter until it is fully melted. Set this aside and begin mixing the dough ingredients.

Dough:
Bubbling away in the Dutch Oven
  • 3 1/4C Flour
  • 1/2C sugar
  • 1/2 tsp Salt
  • 1/4C warm water
  • 1 package active yeast
  • 1 large egg, beaten
  • 1 tsp cinnamon
  • Butter solution mentioned above
** Note:  only add 2 1/4C of the flour while you're first mixing the ingredients together. Once it begins to form into dough, then add the remaining cup of flour a little at a time. Then cover the dough with a damp cloth for about 10 minutes to let it rise.

While the dough and yeast are doing their thing, start making the filling.

Filling:

  • 1C Brown Sugar
  • 1/2C Softened Margarine
  • 1/4 tsp Ground Cloves
  • 1 TBS Cinnamon
  • 1/8 tsp Almond Extract
  • 1/2 tsp Nutmeg
  • 10 drops Pure Vanilla Extract
Mix those items together rapidly to create a paste-like consistency. Use a rolling pin to spread the dough flat on a floured board, then spread the filling material evenly across the surface. Roll the dough, then slice across the width of the roll (about an inch wide per slice). Then place in a pan. 

I chose to bake these rolls in a Dutch Oven. If you decide to use a traditional oven, bake at 375 degrees. It should take around 20-25 minutes for the cinnamon rolls to be done. 

When done, remove the cinnamon rolls from the pan and brush any remaining filling material across the top. Another good alternative would be a cream cheese frosting (like this), depending on your personal preference. 

Enjoy! 

Sunday, November 14, 2010

Plank-Grilled Salmon Fillets + Side Dishes


While checking out a local meat shop, I got the urge to buy some salmon and make a new twist on a classic dish. So, I picked up a couple pounds worth of salmon fillets and headed home. 

I opted to grill the fillets on alder planks, available at most supermarkets or at the Fair Oaks Hardware store here locally. Generally cedar and alder are the two woods most commonly chosen for smoking fish, with cedar being the more aromatic of the two.

The process to make this particular entrĂ©e is fairly simple, but takes a bit of time to complete.

Method:
Ready to serve
  1. Marinate salmon in a solution of white wine (your choice), lemon pepper, sage, tarragon, and dill. Generally 2-4 hours.
  2. Soak wood planks in water for at least one hour
  3. Lightly blacken the planks on each side over a medium-hot grill
  4. Place fillets on the planks, cover with a thick layer of brown sugar
  5. Close the grill and cook at 350-400 degrees until lightly opaque
  6. Serve and enjoy!

For a healthy and easy side dish, I thought of grilled asparagus -- super easy to make and grills quickly. 

Grilled asparagus:
  1. Trim off the thickest bottom portions so all stalks are of equal length
  2. Peel the lower 2 inches, removing the tough, fibrous material
  3. Lightly coat in olive oil
  4. Salt and pepper to taste
  5. Grill over medium-high heat until asparagus becomes tender, but still holds shape (not soggy and bendy like a noodle)
  6. Spray with a light balsamic vinegar, then serve.

Once those two were done, I whipped up some sweet potato fries. Just peel and cut your sweet potatoes into  wedges, coat in oil and rub in spices. I used only salt, pepper, and brown sugar. Then grill hot until crispy. How's THAT for a piece of cake, eh?


Simple. Tasty. Done.  

Sunday, November 7, 2010

Pecan Marinade-Injected Pork Loin

Done and ready to slice!
Why must it always rain when I decide to cook?!

Weather notwithstanding, I went ahead and fired up the grill. And boy, am I glad I did! This recipe came out phenomenally well and, naturally, I just had to share it with you. The best part? It's easy and low-maintenance.

I began by picking up a pork loin from Costco. This thing was huge! Since I only needed to feed 3 people, I prepared just 1/4 of the loin. I vacuum-sealed and froze the rest for another day.

So, first things first... In a small bowl I mixed the following ingredients, which would serve as the marinade to be injected into the meat:
  • 3/4 C  Apple Juice
  • 1/2 C  Water
  • 1/2 C  Brown Sugar
  • 1/4C  Kosher Salt
  • 2 TBS Worcestershire Sauce
After whisking the ingredients together, I filled up my injector needle. You can pick one up at just about any grocery store. I purchased the one seen above at Lowe's. I injected the meat four times on each side, causing it to plump up significantly.

Once the meat was fully injected, I placed it on my grill surface and applied a dry rub. The one I used is called Jeff's Naked Rib Rub, but it works equally well on any cut of pork. You can use whatever rub you prefer. 

Indirect heat with waterpan
Then I fired up my Weber Kettle grill, setting it up for indirect heat. Now, in case you don't understand what I mean by "indirect heat," I've taken a couple photos to demonstrate what I mean. In simplest terms, it means all the charcoal on one side of the grill and a water/drip pan on the other. Once that setup was complete, I placed some soaked wood chips (pecan, in this instance) on top of the charcoal to create a light smoke while the meat cooked. You'll also notice that I opted for lump charcoal, rather than traditional Kingsford-type briquettes. 
Pecan chips on top of lump charcoal


And so, onto the grill went the pork loin. The rub I used is based largely on paprika and brown sugar, so I anticipated that it would eventually create something of a dark brown "bark." I adjusted the upper and lower vents to maintain a temperature of 300 degrees, then went in search of a beer.


Coming along nicely after an hour
 Around an hour or so later, I took a peak at the pork loin to check my progress. The dry rub was, as expected, beginning to form a nice bark and the smell from the grill was incredible! The internal temperature, however, was not high enough to consider it "done." For a pork cut such as this, 150 degrees or so is the appropriate and safe internal temperature. 


It took about another hour to reach the desired temperature. I removed the meat from the grill, wrapped it in foil, and let it rest for 20 minutes (and let me tell you, it was tough to wait that long). I sliced it and taste tested... it was delightfully moist and flavorful with a subtle sweetness. Originally, when I was deciding how to prepare this cut of meat, I had thought it would be necessary to add barbecue sauce -- not so! It was so flavorful that absolutely no sauce of any sort was necessary.

Despite the fact that I've been overly verbose in explaining the methods for preparing this dish, it's remarkably easy and I'm sure you'll have equally terrific results! Trust me, this one is worth a try.


Sunday, October 31, 2010

Barbecue Breakfast "Fattie" Roll

Sliced BBQ Breakfast "Fattie" Roll
Took a bit of a break here, lately, from writing up my cooking exploits. I needed a bit of time to experiment and come up with some new ideas. There were some good, some bad, and some ugly -- but this one, you're sure to love! 

I've made something similar to this once before for dinner, but with different ingredients inside. That's the beauty of the "fattie" roll -- you can put just about anything you want in it and it'll still taste great! This time, I woke up and decided I really wanted a good, hearty, old-school breakfast -- but grilled. I'd cook just about anything on a grill, given a choice.

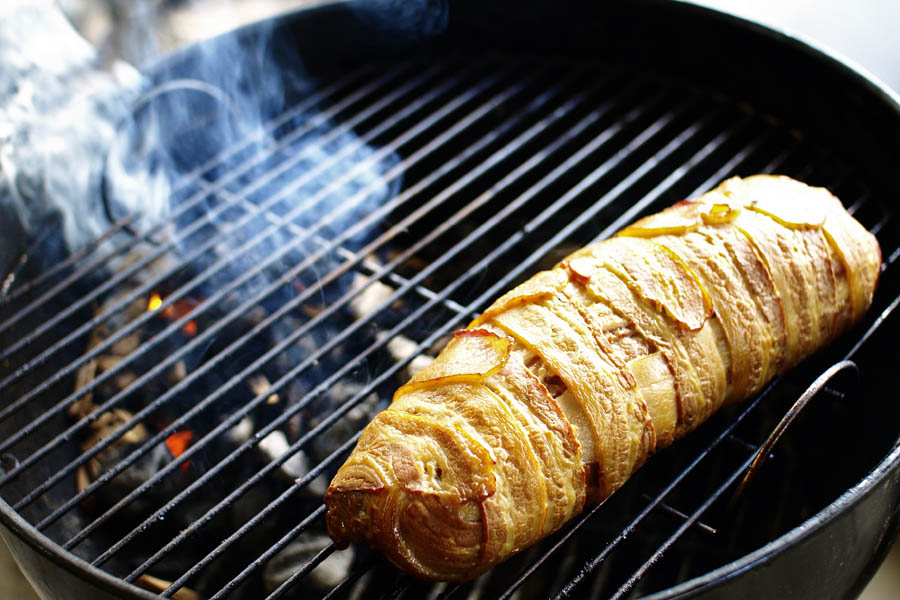
Basically, it's an omlete wrapped and rolled up in a layer of Italian sausage, then that is wrapped in thin strips of bacon. The roll is then grilled over indirect, medium heat until it reaches an internal temperature of 160 degrees and the bacon is crisped.

The prep-work for this meal is a little time consuming but well worth it. I began by dicing up a few things for the filling. I decided on Portabello mushrooms, green bell pepper, and Vidalia onion. I added a little olive oil into a shallow pan, then sauteed until the onion began to look slightly translucent. I then whisked three eggs together in a separate bowl and poured it into the pan with the other ingredients, making something similar to a fritatta. 

Meanwhile, I took about a pound of Italian sausage filling (not in a sausage casing, just the raw sausage meat) and squeezed it into a gallon-sized Ziploc bag. With a rolling pin, I flattened the meat out into a sheet until it filled the bag corner to corner. I cut away the bag along the edges and flopped the sheet of sausage meat onto a large piece of heavy-duty foil, which was pre-rubbed with Pam spray. 

Once the sausage sheet was laid out, I began putting in the filling. What I learned from previous experience is that it's usually best to only put the filling over about one third of the sausage sheet, that way it rolls easily. I added some shredded cheese over the top of my omlete/fritatta-looking filling and began rolling the sausage around it, similar to a Swiss Roll. It goes a lot more smoothly if you just use the foil to roll it up, rather than trying to manipulate the meat-sheet (it's way too soft for that).  When the roll looked about right, I then twisted up the ends of the foil around it (picture a Tootsie roll). I twisted it up tightly, helping to compress the roll a bit and making it much easier to manage for the next step.

After a few minutes in the fridge, I brought the wrapped up roll out and removed the foil. Then I took bacon and wrapped it around the roll, pinning the loose ends down with soaked toothpicks. (Thin bacon is best, as it crisps better and cooks more quickly). 

And onto the grill it went!

As you can see in the picture, all the hot coals are on the opposite side of the grill from the breakfast roll. I tossed some soaked applewood and cherrywood chips onto the coals to produce a soft, aromatic smoke. Then I closed up the grill and manipulated the vents until it held a steady temperature of 350 degrees. (You could just as easily do the same thing in an oven, just skip the wood chips).

After about an hour, I added some more wood chips and opened the vents further, kicking the temperature up to around 425 degrees. I wanted to make sure that the bacon crisped nicely, along with absorbing the sweet apple and cherry smoke. 

It took about another 45 minutes for the roll to reach its desired temperature of 160 degrees. I removed it, then loosely wrapped it in foil for about 15 minutes, letting the juices redistribute back through the roll. Then I sliced, served, and devoured. Score!


Sunday, October 10, 2010

Not-Yo-Momma's Meatloaf

Finished meatlof
A lot of people just cringe when they hear "meatloaf." Dry, flavorless, and something to avoid at all costs. I remember not wanting to eat meatloaf as a kid -- tasted like a ketchup-laden slab of dry meat, which never struck me as a huge treat. Personally, I don't think there are too many dishes that, when done properly, can't be enjoyable. So I decided to revisit meatloaf and see if I could come up with a recipe that would make it more moist, flavorful, and generally defy the preconceived notions that a lot of folks have about this dish.

I poked around the internet to find a basic meatloaf recipe to modify. Seemed pretty straight-forward, really -- very similar to putting together your own hamburger patties, except you make more of it and form it all into a loaf.

From the research I did, not many people were adding seasoning to their meatloaf. I really wanted it to be more than a bland log of meat with some peppers and onions in it. I put the basic "mandatory" ingredients into a mixing bowl and added things I thought would work well and compliment each others' flavor, then continued to tweak the recipe until it felt like the right consistency. When all was said and done, this is what I had come up with:
All put together, ready to cook
  • 1 1/2 lbs. ground beef
  • 1/2 lb. Italian-style ground pork sausage
  • 1 small onion finely chopped
  • 1/2 green bell pepper finely chopped
  • 2 cloves garlic minced (optional)
  • 1 cup   2 C. fresh bread crumbs or saltine cracker crumbs
  • 2 eggs lightly beaten
  • 1 TBS hot sauce of choice
  • 1/2 tsp cayenne pepper (optional)
  • 1 tsp Kosher salt
  • 1 tsp course-ground black pepper
  • 1 tsp Worcestershire sauce
  • 1 handful of dry steak/beef seasoning of choice (McCormicks, Mrs. Dash, Stubbs, whatever you like)
  • 1/2 C. ketchup
  • 1/2 C Barbecue sauce
  • 1/4 C milk
Once that was all mixed together nicely, I formed it into a "loaf" shape using a bread pan, then slid it out into a disposable foil roasting pan. Instead of tossing this little concoction into the oven, as is the status-quo, I opted to put it into my smoker. 

Before I go on, a few optional changes:
You could just as easily put it on a grill, if you wanted -- I just thought it would add another dimension of flavor to get a light wood smoke into the meat, complimenting the BBQ sauce I used in the recipe (a honey smokehouse-type that I made myself). And if you want to avoid the barbecue/smoker angle all together, you could add a half-bottle of "Stubb's Liquid Smoke" to the meatloaf mixture, then put it in the oven.
 So, onto the smoker it went. I guesstimated that it would take around 4 hours at 240* to be done properly. I was shooting for 165* internal temperature and decided to check it once an hour. I also decided to baste the meatloaf with a light coating of BBQ sauce and the drippings in the pan twice during the cooking process to help it keep moist and absorb even more flavor.

Sure enough, as predicted, it took just shy of four hours to reach the desired 165 degree internal temp. I took the pan off the smoker and covered the top with foil for around 15 minutes. Then I transferred it to a serving platter and sliced it up.

My first go-round trying this recipe, the meatloaf was a little loose. It fell apart a bit when I went to slice it up. I changed the amount of bread crumbs from 1 cup to 2 cups -- that caused it to hold together much better. After that minor change, the recipe came out exactly the way I had hoped it would and held together just right. It was very juicy and full of flavor. This recipe totally destroyed the negative image of meatloaf I had for so many years. Tell you what, I'm definitely making this again!

Friday, October 1, 2010

Marinated Tri-Tip Sandwiches

Finished tri-tip sandwich
This delicious dish is something of a west-coast specialty. It's nearly impossible to find a tri-tip roast on the east coast or in the Midwest. Boy, are they missing out! Plus, tri-tip is surprisingly easy to make. The meat requires very little seasoning to taste amazing -- just let the natural flavor of beef shine through.

I've had good luck with marinated tri-tip roasts in the past, so I went back to Winco and purchased about a 3 pound "garlic herb" marinated tri-tip. Last time I made one, my friends devoured it despite the fact that I had charred it too heavily.

Seasoned tri-tip, ready to grill
Once I cut the meat out of the wrapping, I applied a small amount of dry rub to it (just a personal preference). If you really wanted to go with a minimalist approach, you could just pat in a little McCormicks steak seasoning (available at pretty much any chain grocery store). But I digress...


Fire! Fire!
Rather than toss this lovely piece of meat on the smoker (usually reserved for less-than-ideal cuts), I decided to fire up the old-school Weber charcoal grill. But, instead of the usual "hot coals everywhere" setup, I rigged it for indirect heat -- basically hot coals on only one side of the grill, leaving the other half as a cool-zone. When the coals had turned gray, I added the tri-tip to the cool zone and closed up the lid. My thermometer was registering about 325 degrees at grill level on the cooler side.

After 15 minutes I flipped the tri-tip over, keeping it on the cooler side. My Weber was still maintaining around 325 degrees, which seemed just right to me. All totaled, the meat got 30 minutes of grill-time at 325 degrees. Then, before I seared the meat, I checked the internal temperature and found it was about 130 degrees at the thickest point -- just about medium-rare.

Searing in the flavor and juices
I opened the grill up to let in some oxygen and really get the coals burning hot for my sear. It took just a few minutes, but the grill temperature kicked up to around 550 degrees. I moved the tri-tip over the hot-coal-side of the grill and let the meat sear for 3 minutes on each side to give it a nice char which is characteristic of any good tri-tip roast. After pulling the meat off of the grill, I checked the internal temperature and found it had climbed to 142 degrees -- just below medium, right where I wanted it.


Seared, sliced, and ready to rock!
So, inside I went to foil wrap the meat. I let it rest for about 10 minutes and began making thin slices across the grain. It was very juicy, tender, and very flavorful (any real BBQ aficionado can't help but taste test, and often). Then I grabbed the French sandwich buns I bought, added a few slices of provolone cheese, packed it full of tri-tip, and added a bit of my homemade BBQ sauce across the top. It was delicious and a total cinch to make! My folks said they wouldn't change a thing, and I have to agree. I would eat those sandwiches every day if I could afford it.

Monday, September 27, 2010

Bourbon-Bathed Baby Backs with Memphis Magic Dust

First thing when I started getting my prep work done for this recipe, I already had a feeling it was going to be an ordeal -- not because this is a hard recipe to follow, mind you, but because of how ridiculous Sacramento-area grocery stores are. Seriously, how hard should it be to find two racks of fresh baby-back ribs? Isn't that a fairly common thing for people to throw on a grill? The only place I could find with baby back ribs that weren't frozen into a freakin' ice cube was Winco, of all places. Anyway, first things first...

After I located some baby backs, I had to get moving on making the marinade or my ribs wouldn't have enough time to soak before I got them on my smoker. I've never used this marinade before, but how could I not try it when it has bourbon and a can of beer in the ingredients list?!  All in all, the "Bourbon Bath" consisted of:

  • 1/2 cup of Jim Beam
  • 1/2 cup brown sugar
  • 1 can of beer (I used Bud Light, since it's what I had on hand)
  • 2 tablespoons soy sauce
  • 2 tablespoons Worcestershire sauce
  • 1 tablespoon chopped garlic
  • 1 teaspoon black pepper

I stirred that up, brought it up to a boil, then let it cool for about an hour. Then I put my racks of ribs into large Ziploc bags and poured in the marinade, sealed 'em up, and put them in the fridge to do their thing until just before cook time. Not gonna lie, the marinade smelled awesome so I was feeling pretty hopeful!


(Make sure you remove the membrane or "fell" from the rib bones before you start marinading or seasoning the meat!)

While I was waiting for the meat to be grill-ready, I went about putting together my own spin on what's known as Memphis Magic Dust. And the beautiful thing about this rub -- it's easy and I had all the ingredients! All I did was take the items below, stir them together in a metal mixing bowl, and cover them up until the ribs were done marinating.

  • 3/4 cup firmly packed dark brown sugar
  • 3/4 cup white sugar
  • 1/2 cup paprika
  • 1/4 cup kosher salt
  • 1/4 cup garlic powder
  • 2 tablespoons ground black pepper
  • 2 tablespoons ground ginger powder
  • 2 tablespoons onion powder
  • 2 teaspoons rosemary powder

(I made a few minor changes to the original rub recipe to suit my personal taste.)

Dry rub texture pre-smoke
So, after a few hours, I removed the ribs from the wet marinade and applied the dry rub. I wrapped them back up in plastic and refrigerated them a bit longer. While the meat was taking to the dry rub, I went ahead and pre-heated the smoker. It usually takes about 45 mins to an hour for my smoker to get to its target temperature of 240 degrees. I also started soaking my wood chunks that would be going into the smoker.


Right on schedule, I put the ribs onto the smoker. I chose hickory wood to create my smoke, which is usually my choice when doing pork. I closed up the smoker, not to open it again for around 3 hours. Then I got myself situated with a bucket full of beers, popped a movie in the DVD player, and kicked back for a while.  (One of my favorite things about slow cooking on the smoker!)

Three hours later, the rib meat was beginning to retract nicely from the tip of the bones. I went ahead and wrapped them in foil with just a little bit of apple juice inside, then put them back on the smoker. (Apple juice is known to help tenderize meat while maintaining internal moisture. The addition of juice, however, is optional.)  And so back on they went for another hour.

Note the golden color and rib retraction:
good signs!
Just before going in foil wrap

An hour passed and I was chomping at the bit to remove the ribs and get them sauced! I pulled them off the smoker and found that they had done just what I had in mind:  stayed moist, retracted from the bone a tad bit more, and the dry rub had formed a nice "bark" or semi-hard crust. From there, I chose a store-bought barbecue sauce and added a light coating to the meaty surface of the ribs. Then, into a pre-heated 350 degree oven they went -- to caramelize and crisp the sauce a little.
After receiving a light coat of sauce
While the ribs were in the oven, I kept an eye on them to make sure I didn't burn the sauce (or meat, for that matter). Once fifteen minutes had gone by, I felt like the sauce was sufficiently darkened and it was "time." I pulled the ribs out of the oven and covered them in foil for 10 more minutes to rest before being sliced up.

See the red "smoke ring"?
Oh my goodness was I pleased when I began to cut into the ribs! I was able to pull the ribs apart easily with just a bit of a tug, no knife required -- now that's what they mean when they say "falling off the bone." I also noticed that there was a good smoke ring around the outer layer of the flesh (indicates depth of smoke penetration/flavor into the meat). In the pictures below, it's the outside part of the meat that looks a pink-ish red.  I was super-stoked at how well these ribs came out, especially in light of my recently failed rib experiment!

Finished product


I would have taken better pictures of the ribs plated up, but I was in a hurry to eat. Do you blame me?